11 Frontend tricks that most Developers don’t know about
Interesting tricks you can do with HTML/JS/CSS
Below are some tricks which a lot of frontend developers don't know about. To do with HTML/CSS/JavaScript.
Hopefully, there will be at least a couple on the list which you didn't know about!
1. Datalist element
One HTML element that you don’t see used much at all and for no reason!
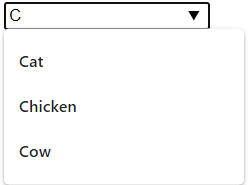
The tag is used to provide an "autocomplete" feature for elements. You will see a drop-down list of pre-defined options as you type.

Example:
<input **list="animals"** name="animal" id="animal">

<datalist **id="animals"**>
    <option value="Cat">
    <option value="Dog">
    <option value="Chicken">
    <option value="Cow">
    <option value="Pig">
  </datalist>
The id attribute (see bold items above) must be equal to the list attribute of the , this is what binds them together.
2. Clickable label with a checkbox
If you want a clickable label for checkbox, you would usually use have a label element with a “for” attribute, like below.
<input type="checkbox" name="checkbox" id="checkbox_id" value="value">
<label for="checkbox_id">I agree</label>
You can actually just put the label element around the checkbox to accomplish the same thing. So when you click “I agree” it will select the checkbox!
Example:
<label><input type="checkbox" name="checkbox" id="checkbox_id" value="value">I agree</label>
3. Child selectors
Probably more of the most well used on this list but most people don’t know the extent of their power.
Child Selectors are used to match all the elements which are a child of a specified element. It gives the relation between two elements.
Examples:
 /* 1st <li> element */
 li:first-child {
    color: red;
 }

/* Last <li> element */
 li:last-child {
     color: green;
 }

// Select All <li> elements but The First Three */
li:nth-child(n+4) {
      color: yellow;
}

/* Select only the first 3 <li> elemets */
li:nth-child(-n+3) {
    color: green;
}

/* Styles are elements that are not a <p> */
.my-class:not(p) {
    display: none;
}
4. Writing mode
Writing mode is little known yet quite powerful CSS property.
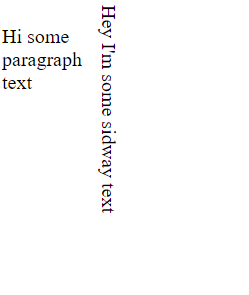
This allows text to run vertically like this:
 Vertical text
The code for accomplishing this very simple.
writing-mode: vertical-rl;
Full example:
<style>
.sideway {
   writing-mode: vertical-rl;
}
.normal {
   width: 5%;
   float: left;
}
</style>
<p class="normal">
     Hi some paragraph text
</p>
<p class="sideway">
     Hey I'm some sidway text
</p>
The writing-mode property has five possible options.
  writing-mode: horizontal-tb;
  writing-mode: vertical-rl;
  writing-mode: vertical-lr;
  writing-mode: sideways-rl;
  writing-mode: sideways-lr;
5. calc() function
The calc() CSS function lets you perform calculations when specifying CSS property values.
The most useful ability of calc() is its ability to mix units, like percentages and pixels. No Preprocessor will ever be able to do that. It is something that has to happen at render time.
Examples:
width: calc(5px + 100px);
width: calc(6em * 8);
width: calc(100% - 50px);
6. Math.round & Math.floor alternatives
Maybe not the easiest to read but still a cool trick.
Math.floor() you can use 0|:
**0|**743.4343 // returns 743
Math.floor(743.4343) // returns 743
Math.round() you can use +.5|0 :
812.777**+.5|0** // returns 813
Math.round(812.777) // returns 813
7. Console.table
Hopefully, by now you have heard and used console.log() but one you may not is console.table() which takes in an array or an object. This displays a table in the console view in a very neat way!
Array Example:
let car1 = { name : "Audi", model : "A4" }
let car2 = { name : "Volvo", model : "XC90" }
let car3 = { name : "Ford", model : "Fusion" }

console.table([car1, car2, car3]);
 console.table()
8. Console.time
Another useful console method. console.time() starts a timer. It takes a parameter as a label. Then you use console.timeEnd() with the same label name and the console will output the time in milliseconds from when you called console.time() and console.timeEnd()
 console.time()
Example:
// Starts the timer
console.time("MyTimer");

// Ends the timer and outputs the time in milliseconds
console.timeEnd("MyTimer");
9. In operator
The “in” operator can check if an index exists in an array and will return true or false.
Example:
let cars = ['Audi', 'BMW', 'Mini', 'Bentley', 'Porsche'];

0 in cars        // returns true
3 in cars        // returns true
6 in cars        // returns false
You can also check if a property exists in an object.
Example:
const person = { firstName : "Dave", surname: "Smith", age: 34 };

'firstName' in person  // returns true
'surname' in person    // returns true
'age' in person        // returns true
'gendar' in person     // returns false
10. Make Chrome a text editor
Maybe a very random one on the list. If you enter the below in URL bar and hit the return key. It will turn Chrome into a notepad
data:text/html, <html contenteditable>
11. Multiple statements in if block without curly brackets
I wouldn’t use this actual production code but still one a lot of people don’t know about. The trick is the comma!
if (1 === 1)
 alert("Alert 1"), alert("Alert 2");
Conclusion
All of the above in the list might not be the most practical but some of them are definitely not used enough in frontend development and can really help you expand your frontend skills. I’m sure there are a lot more tricks!
Hope you’ve enjoyed reading!
Did you like reading this? If so, get more similar content by reading the rest of the blog!